 unixwerk
How to Setup KVM for Windows Guests
Contents
- Introduction
- Installation of Required Packages
- Init Scripts
- Create an Empty Image to Use for Windows Installation
- Installation of the Windows Guest
- Start Virtual Machine
- Attach a USB Device to a Windows VM
- Gnome Virtual Machine Manager
- Snapshots
- Setup Network Bridging
1. Introduction
This is a brief log of what I did to get Windows XP running under KVM control.
The installation was done under Fedora 13. Later on I was able to start the
just created VM under Slackware 13 as well. Note that you need an x86 compatible
CPU with enhanced virtualization support (AMD-V or Intel VT).
2. Installation of Required Packages
Under Fedora I had to install 4 additional packages:
root@tux# yum install kvm qemu virt-manager libvirt
Note on Slackware:
You need to download two packages (for Slackware64 13.1) in order to get qemu-kvm running:
The packages can be installed with:
root@darkstar# installpkg vde-2.3.1-x86_64-1alien.tgz qemu-kvm-0.12.5-x86_64-1alien.tgz
3. Init Scripts
libvirtd/libvirt-guests should be started at boottime. Check with:
root@tux# chkconfig --list | grep 'virt'
libvirt-guests 	0:off	1:off	2:off	3:on	4:on	5:on	6:off
libvirtd       	0:off	1:off	2:off	3:on	4:on	5:on	6:off
If not already started, start them
root@tux# chkconfig libvirtd on
root@tux# chkconfig libvirt-guests on
4. Create an Empty Image to Use for Windows Installation
I created a 12 GB RAW image file for the Windows VM:
root@tux# qemu-img create -f raw /kvmimages/winxp.img 12G
5. Installation of the Windows Guest
In order to be able to install Windows XP as a KVM guest you need an official installation image either as CD/DVD or as an image file on disk. I used the latter variant.
The installation can be started with a command like this:
root@tux# qemu-kvm -cdrom /images/winxp.iso -m 768 -boot d /kvmimages/winxp.img
In the above command /images/winxp.iso is the Windows XP installation CD image and /kvmimages/winxp.img is the RAW image we created with step 4. With -m 768 we assign 768MB of memory to the VM.
Now we see the Windows CD booting into the Windows XP installer.
6. Start Virtual Machine
After the installation completed we are ready to start the Windows Guest. I still kept the installation CD assigned and started the guest with the below command:
root@tux# qemu-kvm -localtime -cdrom /images/winxp.iso -m 768 /kvmimages/winxp.img
The option '-localtime' can be used to set the Linux time and date as local time for the Windows guest.
Note on Slackware:
The kernel modules for kvm are not loaded by default. You have to do it manually. Since my computer has an AMD CPU I had to load the AMD module:
root@darkstar# modprobe kvm_amd
Load kvm_intel if your computer runs on an Intel CPU. The Windows VM will be started with qemu-system-x86_64:
root@darkstar# qemu-system-x86_64 -localtime -cdrom /images/winxp.iso -m 768 /kvmimages/winxp.img
7. Attach a USB Device to a Windows VM
If your system automatically mounts removable devices, umount it:
root@tux# df | grep media
/dev/sdg1              1000508    498908    501600  50% /media/TOSHIBA
root@tux# umount /media/TOSHIBA
If you see more than one device and you're not sure which one you just attached check with 'dmesg'.
Then find the right vendor:device id with lsusb
root@tux# lsusb
Bus 007 Device 001: ID 1d6b:0001 Linux Foundation 1.1 root hub
Bus 006 Device 001: ID 1d6b:0001 Linux Foundation 1.1 root hub
Bus 005 Device 001: ID 1d6b:0001 Linux Foundation 1.1 root hub
Bus 004 Device 001: ID 1d6b:0001 Linux Foundation 1.1 root hub
Bus 003 Device 002: ID 046d:c050 Logitech, Inc. RX 250 Optical Mouse
Bus 003 Device 001: ID 1d6b:0001 Linux Foundation 1.1 root hub
Bus 002 Device 004: ID 0930:652a Toshiba Corp. TravelDrive       <== this is my USB stick
Bus 002 Device 002: ID 1307:0330 Transcend Information, Inc.
Bus 002 Device 001: ID 1d6b:0002 Linux Foundation 2.0 root hub
Bus 001 Device 001: ID 1d6b:0002 Linux Foundation 2.0 root hub
Attach the device along with the start of the VM:
root@tux# qemu-kvm -usb -localtime -usbdevice host:0930:652a -m 768 /kvmimages/winxp.img
8. Gnome Virtual Machine Manager
Gnome's Virtual Machine Manager is a tool to manage virtual machines from a GUI. We can import our just created Windows VM into the Virtual Machine Manager. All we need to do is to start it with:
user@tux$ sudo /usr/bin/virt-manager
Alternatively you can launch it from the Gnome menu:
 Application -> System Tools -> Virtual Machine Manager
Both methods will bring up the main window. In order to find guest images I had to create a new storage pool KVMIMAGES to point
to the location where I decided to put VM images: /kvmimages. And that's how it's been done: From the main window choose
Edit -> Connection Details. In the Storage Tab click on the
'+'-sign to add a new storage pool:
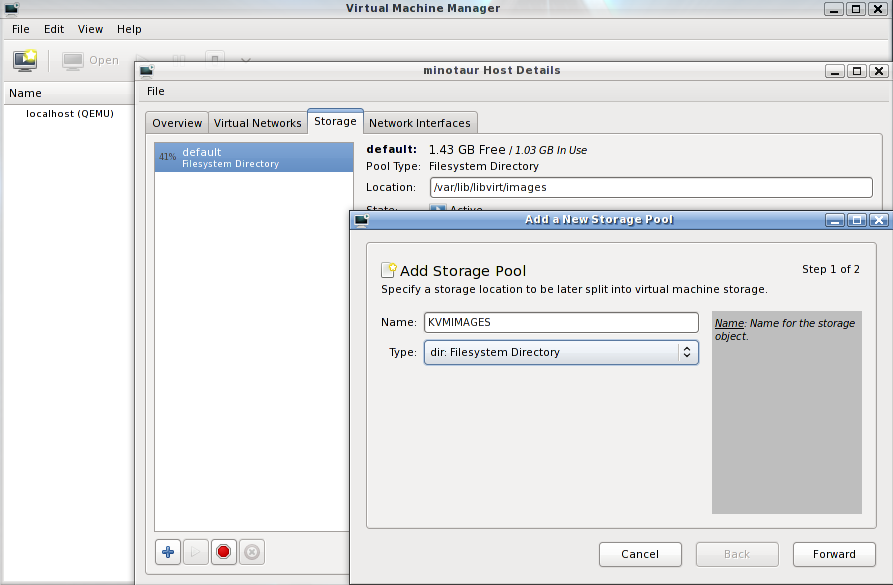
Click on Forward. In the next window use /kvmimages as Target Path. Click on Finish. A new storage pool will show up in the Storage Tab. When we select the new storage pool we see our just created image file under Volumes.
To add our image to the Virtual Machine Manager we go back to the main menu and create a new VM (Right click on localhost (QEMU) -> New).
We set a name (WINXP) and choose Import existing disk image. In the next windows we provide the path to our image, set OS type and
Windows version, the amount of real memory and the number of CPUs we want to reserve for Windows and press Finish. Our Windows
Installation will start.
9. Snapshots
Creating snapshots is as easy as copying a file:
root@tux# cp /kvmimages/winxp.img /kvmimages/.snapshots/winxp.$(date +%Y-%m-%d)
Be sure you stopped Windows before creating the snapshot. I suggest to create the snapshots on a separate filesystem on a different disk. My setup is:
root@tux# df | grep kvmimages
/dev/sda5             51612920   3987204  47625716   8% /kvmimages
/dev/sdb5             51613016   3481260  48131756   7% /kvmimages/.snapshots
10. Setup Network Bridging
In order to establish a network connection between Windows guest and Linux host we have to setup a public bridge. Under Fedora we have to create a new file ifcfg-br0 under /etc/sysconfig/network-scripts. A good starting point is our ifcfg-eth0 (assuming eth0 is our Ethernet adapter).
root@goddard# cd /etc/sysconfig/network-scripts
root@goddard# cp ifcfg-eth0 ifcfg-br0
We only have to change a few lines:
- change DEVICE=eth0 to DEVICE=br0
- remove the line BOOTPROTO=....
- remove the line HWADDR=....
- add a line TYPE=bridge
ifcfg-eth0 has to be changed to only contain 4 lines:
DEVICE=eth0
BRIDGE=br0
HWADDR=<Your MAC address>           # just keep the old line!
ONBOOT=yes
If you used any additional IP addresses on eth0, you'll find additional files under /etc/sysconfig/network-scripts that need your attention - such as ifup-eth0:0. The IP addresses have to be transfered to br0 as well. Just rename the file(s) and change DEVICE to br0:0 and TYPE to Bridge:
root@goddard# mv ifcfg-eth0:0 ifcfg-br0:0
root@goddard# sed -i -e 's/eth0/br0/' -e 's/Ethernet/Bridge/' ifcfg-br0:0
Restart your network:
root@goddard# /etc/init.d/network restart
A new interface br0 will be shown in the ifconfig output.
(Please note: This example explains how to setup a network bridge under Redhat style systems. For Suse or Debian based systems
please refer to www.linux-kvm.org/page/Networking. How to
setup a network bridge manually is shown in  How
to Setup KVM for Windows Guests on Slackware)
How
to Setup KVM for Windows Guests on Slackware)
To connect our Windows VM to the bridged network we have to create a script /etc/qemu-ifup:
root@goddard# vi /etc/qemu-ifup
#!/bin/sh
switch=br0

if [ -n "$1" ];then
        /sbin/ip link set $1 up
        sleep 0.5s
        /usr/sbin/brctl addif $switch $1
        exit 0
else
        echo "Error: no interface specified"
        exit 1
fi
root@goddard# chmod +x /etc/qemu-ifup
Now we are ready to start our Windows guest with access to the host network:
root@goddard# qemu-kvm -localtime -m 768 /kvmimages/winxp.img -net nic,macaddr=DE:AD:BE:EF:61:C3 -net tap
The last 2 digits of the mac address should be randomly generated to support more than one VM.
A. Related Information